
Chet.Admin 模块详解⑨:全局公告 + 个人通知 + 未读计数 🔔
《Chet.Admin 全栈实战》系列第 15 篇
前言
做后台系统,通知公告 是刚需。
- 系统升级了,要发个全站公告 📢
- 某用户被分配了新任务,要单独通知他 📩
- 顶部铃铛还得有红点,提示未读数 🔴
这些需求看着简单,但真要设计好,数据库表结构、已读状态追踪、N+1 查询优化,每一项都有坑。
Chet.Admin 内置了一套完整的通知系统,今天来拆解它的实现 👇
整体架构
先看全景图:
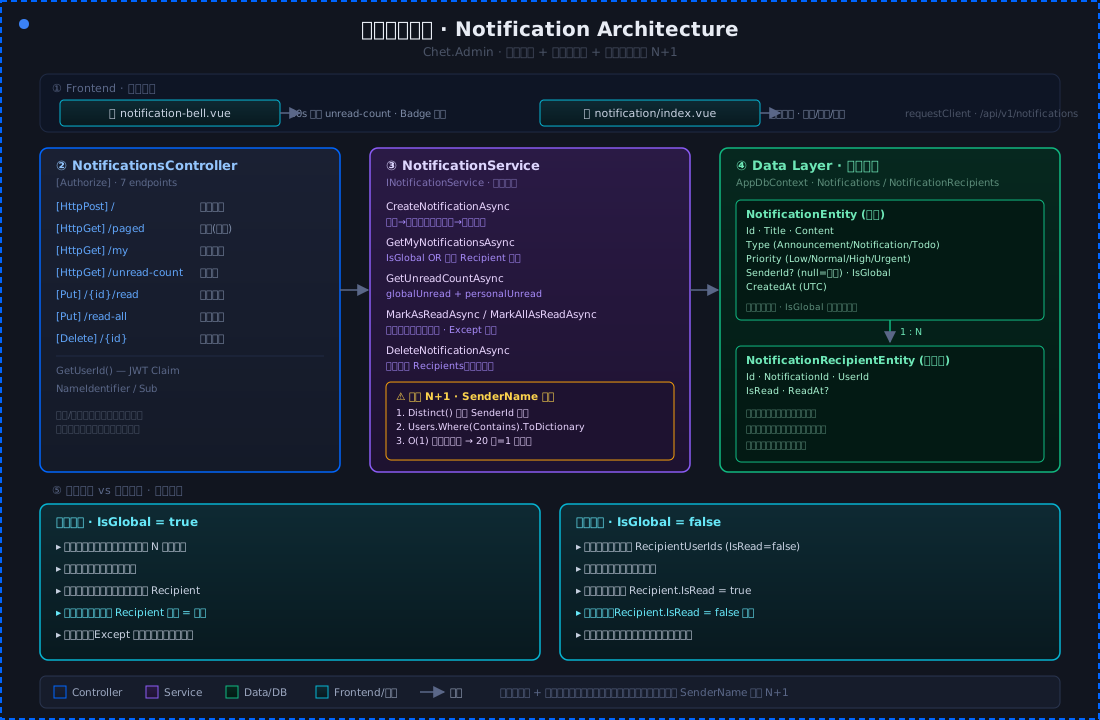
核心设计:
通知表(Notifications) + 接收者表(NotificationRecipients)
  → 全局通知:所有人可见,按需创建已读记录
  → 个人通知:指定接收者,有已读状态
涉及的核心文件:
| 层 | 文件 | 职责 |
|---|---|---|
| 控制器 | NotificationsController.cs | 7 个接口 |
| 服务 | NotificationService.cs | 业务逻辑 |
| 实体 | NotificationEntity.cs | 通知 + 接收者双实体 |
| DTO | NotificationDtos.cs | 数据传输对象 |
| 前端页面 | notification/index.vue | 管理列表 |
| 前端铃铛 | notification-bell.vue | 顶部通知组件 |
| API | notification.ts | 请求封装 |
一、双表设计:通知 + 接收者
1.1 通知实体
通知主表存储 通知本身的信息:
public class NotificationEntity
{
    public int Id { get; set; }
    public string Title { get; set; } = string.Empty;       // 标题
    public string Content { get; set; } = string.Empty;      // 内容
    public string Type { get; set; } = "Notification";       // 类型
    public string Priority { get; set; } = "Normal";         // 优先级
    public int? SenderId { get; set; }                        // 发送人(null=系统)
    public bool IsGlobal { get; set; }                        // 是否全局
    public DateTime CreatedAt { get; set; } = DateTime.UtcNow;
}关键字段:
- Type:三种类型 ——
Announcement(公告)/Notification(通知)/Todo(待办) - Priority:四级优先级 ——
Low/Normal/High/Urgent - IsGlobal:
true= 全局公告,所有人可见;false= 个人通知,指定接收者 - SenderId:
null表示系统发送,否则记录发送人 ID
1.2 接收者实体
为什么需要单独一张接收者表?
因为要追踪 每个用户对每条通知的已读状态,主表存不了。
public class NotificationRecipientEntity
{
    public int Id { get; set; }
    public int NotificationId { get; set; }   // 通知ID
    public int UserId { get; set; }           // 接收用户ID
    public bool IsRead { get; set; }          // 是否已读
    public DateTime? ReadAt { get; set; }     // 阅读时间
}设计思路:
| 场景 | IsGlobal | 接收者表 |
|---|---|---|
| 全局公告 | true | 创建时不写,用户首次阅读时写入已读记录 |
| 个人通知 | false | 创建时批量写入指定接收者,初始 IsRead=false |
全局公告的妙处:不提前创建 N 条接收者记录(N = 总用户数),而是 懒加载 —— 用户阅读时才创建已读记录,节省存储 💡
二、创建通知
2.1 创建逻辑
public async Task<NotificationDto> CreateNotificationAsync(CreateNotificationDto dto, int? senderId = null)
{
    var entity = new NotificationEntity
    {
        Title = dto.Title,
        Content = dto.Content,
        Type = dto.Type,
        Priority = dto.Priority,
        IsGlobal = dto.IsGlobal,
        SenderId = senderId,
        CreatedAt = DateTime.UtcNow
    };

    _dbContext.Notifications.Add(entity);
    await _dbContext.SaveChangesAsync();

    // If not global, create recipient records
    if (!dto.IsGlobal && dto.RecipientUserIds is { Count: > 0 })
    {
        foreach (var userId in dto.RecipientUserIds)
        {
            _dbContext.NotificationRecipients.Add(new NotificationRecipientEntity
            {
                NotificationId = entity.Id,
                UserId = userId,
                IsRead = false
            });
        }
        await _dbContext.SaveChangesAsync();
    }

    return _mapper.Map<NotificationDto>(entity);
}流程:
- 先插入通知主表
- 如果是 个人通知,再批量插入接收者记录
- 全局公告 不写接收者表,省存储
2.2 创建 DTO
public class CreateNotificationDto
{
    public required string Title { get; set; }
    public required string Content { get; set; }
    public string Type { get; set; } = "Notification";
    public string Priority { get; set; } = "Normal";
    public bool IsGlobal { get; set; }
    public List<int>? RecipientUserIds { get; set; }   // 接收用户ID列表
}
required 关键字 是 C# 11 的新特性,强制标题和内容 必须赋值,否则编译报错。
三、发送者用户名回填:避免 N+1
3.1 N+1 问题
通知表只有 SenderId,没有 SenderName。展示时需要显示发送者名字。
错误做法(N+1):
// ❌ 每条通知查一次用户表
foreach (var dto in dtos)
{
    dto.SenderName = await _dbContext.Users.FindAsync(dto.SenderId)?.Name;
}
20 条通知 = 20 次查询 = 灾难 💥
3.2 批量查询优化
正确做法:先收集所有 SenderId,一次查询批量拿回名字。
// 批量回填发送者用户名,避免 N+1 查询
var senderIds = dtos
    .Where(d => d.SenderId.HasValue)
    .Select(d => d.SenderId!.Value)
    .Distinct()
    .ToList();

if (senderIds.Count > 0)
{
    var senderNames = await _dbContext.Users.AsNoTracking()
        .Where(u => senderIds.Contains(u.Id))
        .ToDictionaryAsync(u => u.Id, u => u.Name);

    foreach (var dto in dtos.Where(d => d.SenderId.HasValue))
    {
        if (senderNames.TryGetValue(dto.SenderId!.Value, out var name))
        {
            dto.SenderName = name;
        }
    }
}三步走:
- ✅
Distinct()去重,相同发送者只查一次 - ✅
Contains批量查询,一次拿回所有名字 - ✅
ToDictionary转字典,O(1) 查找回填
20 条通知 → 1 次查询 搞定 👍
四、未读计数 API
4.1 计数逻辑
未读数要 同时统计全局公告和个人通知:
public async Task<UnreadCountDto> GetUnreadCountAsync(int userId)
{
    // 全局通知未读数:没有对应的已读接收者记录
    var globalUnread = await _dbContext.Notifications
        .AsNoTracking()
        .Where(n => n.IsGlobal
            && !_dbContext.NotificationRecipients
                .Any(r => r.NotificationId == n.Id && r.UserId == userId && r.IsRead))
        .CountAsync();

    // 个人通知未读数:接收者记录中 IsRead=false
    var personalUnread = await _dbContext.NotificationRecipients
        .AsNoTracking()
        .Where(r => r.UserId == userId && !r.IsRead
            && !_dbContext.Notifications.Any(n => n.Id == r.NotificationId && n.IsGlobal))
        .CountAsync();

    return new UnreadCountDto { Count = globalUnread + personalUnread };
}
全局未读 的判断逻辑:
- 全局公告对所有人生效,没有接收者记录 = 未读
- 有接收者记录且
IsRead = true= 已读 - 有接收者记录但
IsRead = false= 未读
个人未读 的判断逻辑:
- 接收者表里
IsRead = false的记录数 - 排除全局通知(避免和 globalUnread 重复计算)
4.2 前端红点
未读数 API 被前端铃铛组件 每 30 秒轮询一次:
let timer: ReturnType<typeof setInterval> | null = null;

onMounted(() => {
  fetchUnreadCount();
  timer = setInterval(fetchUnreadCount, 30_000);   // 30秒轮询
});

onUnmounted(() => {
  if (timer) clearInterval(timer);
});
用 Badge 组件展示红点数字:
<Badge :count="unreadCount" :overflow-count="99" size="small">
  <div class="... cursor-pointer ...">
    <Bell class="size-4" />
  </div>
</Badge>
超过 99 显示 99+,小红点提醒用户有新通知 🔴
五、标记已读
5.1 单条已读
public async Task MarkAsReadAsync(int notificationId, int userId)
{
    var notification = await _dbContext.Notifications.FindAsync(notificationId)
        ?? throw new NotFoundException(nameof(NotificationEntity), notificationId);

    var recipient = await _dbContext.NotificationRecipients
        .FirstOrDefaultAsync(r => r.NotificationId == notificationId && r.UserId == userId);

    if (recipient == null)
    {
        // 为全局通知创建已读记录(首次阅读)
        _dbContext.NotificationRecipients.Add(new NotificationRecipientEntity
        {
            NotificationId = notificationId,
            UserId = userId,
            IsRead = true,
            ReadAt = DateTime.UtcNow
        });
    }
    else if (!recipient.IsRead)
    {
        recipient.IsRead = true;
        recipient.ReadAt = DateTime.UtcNow;
    }

    await _dbContext.SaveChangesAsync();
}全局通知的懒加载:用户首次阅读时,才创建接收者记录。这就是 双表设计 的精妙之处。
5.2 全部已读
public async Task MarkAllAsReadAsync(int userId)
{
    // 1. 标记个人未读通知为已读
    var unreadRecipients = await _dbContext.NotificationRecipients
        .Where(r => r.UserId == userId && !r.IsRead)
        .ToListAsync();

    foreach (var recipient in unreadRecipients)
    {
        recipient.IsRead = true;
        recipient.ReadAt = DateTime.UtcNow;
    }

    // 2. 为全局通知补建已读记录(用户从未读过的全局通知)
    var globalNotificationIds = await _dbContext.Notifications
        .AsNoTracking()
        .Where(n => n.IsGlobal)
        .Select(n => n.Id)
        .ToListAsync();

    var existingRecipientNotificationIds = await _dbContext.NotificationRecipients
        .AsNoTracking()
        .Where(r => r.UserId == userId)
        .Select(r => r.NotificationId)
        .ToListAsync();

    // 差集:全局通知中用户没有接收者记录的
    var missingGlobalIds = globalNotificationIds.Except(existingRecipientNotificationIds).ToList();

    foreach (var notificationId in missingGlobalIds)
    {
        _dbContext.NotificationRecipients.Add(new NotificationRecipientEntity
        {
            NotificationId = notificationId,
            UserId = userId,
            IsRead = true,
            ReadAt = DateTime.UtcNow
        });
    }

    await _dbContext.SaveChangesAsync();
}两步走:
- 个人通知:直接把
IsRead改成true - 全局通知:用
Except找出没有接收者记录的,批量补建
六、我的通知列表
用户只看 自己能看到的 通知:全局公告 + 指定给自己的。
public async Task<PagedResult<NotificationDto>> GetMyNotificationsAsync(int userId, PagedRequest request)
{
    // Global notifications + notifications where user is a recipient
    var query = _dbContext.Notifications.AsNoTracking()
        .Where(n => n.IsGlobal
            || _dbContext.NotificationRecipients.Any(r => r.NotificationId == n.Id && r.UserId == userId));

    // ... 分页查询

    // 为每条通知设置已读状态
    foreach (var dto in dtos)
    {
        if (dto.IsGlobal)
        {
            var recipient = await _dbContext.NotificationRecipients
                .AsNoTracking()
                .FirstOrDefaultAsync(r => r.NotificationId == dto.Id && r.UserId == userId);
            dto.IsRead = recipient?.IsRead ?? false;   // 没记录 = 未读
        }
        else
        {
            var recipient = await _dbContext.NotificationRecipients
                .AsNoTracking()
                .FirstOrDefaultAsync(r => r.NotificationId == dto.Id && r.UserId == userId);
            dto.IsRead = recipient?.IsRead ?? true;    // 没记录 = 已读(理论上不该出现)
        }
    }

    return new PagedResult<NotificationDto>(dtos, request.PageNumber, request.PageSize, totalCount);
}已读状态逻辑:
- 全局通知:没有接收者记录 →
false(未读) - 个人通知:没有接收者记录 →
true(已读,兜底处理)
七、控制器:7 个接口
[HttpPost]                    // 创建通知
[HttpGet("paged")]            // 分页查询全部通知(管理)
[HttpGet("my")]               // 我的通知
[HttpGet("unread-count")]     // 未读数
[HttpPut("{id}/read")]        // 标记单条已读
[HttpPut("read-all")]         // 全部已读
[HttpDelete("{id}")] // 删除通知权限控制:创建和删除需要权限,查看自己的通知和标记已读 所有登录用户可用。
八、前端:顶部铃铛组件
8.1 交互流程
铃铛组件是整个通知系统的 门面,交互最复杂:
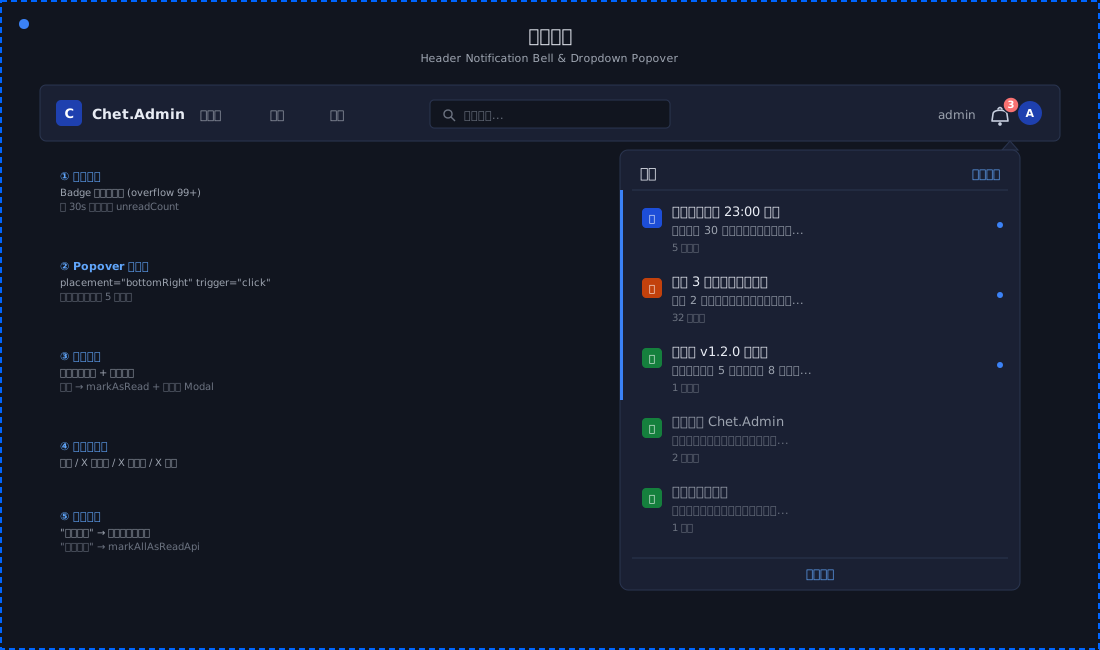
<Popover :open="open" trigger="click" placement="bottomRight" @open-change="onOpenChange">
  <template #content>
    <!-- 通知列表 -->
  </template>
  <Badge :count="unreadCount" :overflow-count="99" size="small">
    <Bell class="size-4" />
  </Badge>
</Popover>交互细节:
- 点击铃铛 → 弹出通知列表
- 列表展示最新 5 条
- 点击通知项 → 标记已读 + 弹出详情 Modal
- 「全部已读」按钮 → 一键清空
- 「查看全部」→ 跳转到通知管理页面
8.2 时间格式化
通知时间显示为 相对时间,更友好:
function formatTime(dateStr: string) {
  const date = new Date(dateStr);
  const now = new Date();
  const diff = Math.floor((now.getTime() - date.getTime()) / 60_000);
  if (diff < 1) return '刚刚';
  if (diff < 60) return `${diff}分钟前`;
  if (diff < 1_440) return `${Math.floor(diff / 60)}小时前`;
  return `${Math.floor(diff / 1_440)}天前`;
}
「刚刚」「5分钟前」「3小时前」「2天前」,比 2026-07-10 14:30:00 直观多了 👀
8.3 通知详情弹窗
点击通知项后,弹出详情 Modal:
<Modal v-model:open="detailVisible" :title="currentNotification?.title" :footer="null" width="520px">
  <div v-if="currentNotification" class="space-y-3">
    <div class="flex flex-wrap items-center gap-2">
      <Tag :color="typeColorMap[currentNotification.type]">
        {{ typeLabelMap[currentNotification.type] }}
      </Tag>
      <Tag :color="priorityColorMap[currentNotification.priority]">
        优先级:{{ priorityLabelMap[currentNotification.priority] }}
      </Tag>
    </div>
    <div class="border-t pt-3 text-sm leading-6 whitespace-pre-wrap">
      {{ currentNotification.content || '(无内容)' }}
    </div>
  </div>
</Modal>
whitespace-pre-wrap 保留内容中的换行,长文本也能正常显示 ✅
九、前端:通知管理页面
9.1 创建通知表单
表单支持 动态显隐接收者字段:
{
  component: 'Select',
  fieldName: 'recipientUserIds',
  label: '接收者',
  dependencies: {
    triggerFields: ['isGlobal'],
    rule: (values) => ({
      componentProps: { mode: 'multiple', options: userOptions.value }
    }),
    if: (values) => !values.isGlobal,   // 非全局通知才显示
  },
}
isGlobal 开关切换时,接收者字段自动显隐:
- 全局通知 → 隐藏接收者
- 个人通知 → 显示多选接收者
9.2 彩色标签
类型和优先级用不同颜色区分:
const typeColorMap: Record<string, string> = {
  Announcement: 'blue',     // 公告 - 蓝色
  Notification: 'green',     // 通知 - 绿色
  Todo: 'orange',           // 待办 - 橙色
};

const priorityColorMap: Record<string, string> = {
  Low: 'default',           // 低 - 灰色
  Normal: 'blue',           // 普通 - 蓝色
  High: 'orange',           // 高 - 橙色
  Urgent: 'red',            // 紧急 - 红色
};
紧急通知是 红色 Tag,一眼就看到 🚨
十、删除通知
删除通知要 同时删主表和接收者表:
public async Task DeleteNotificationAsync(int id)
{
    var notification = await _dbContext.Notifications.FindAsync(id)
        ?? throw new NotFoundException(nameof(NotificationEntity), id);

    // 删除关联的接收者记录
    var recipients = await _dbContext.NotificationRecipients
        .Where(r => r.NotificationId == id)
        .ToListAsync();
    _dbContext.NotificationRecipients.RemoveRange(recipients);

    _dbContext.Notifications.Remove(notification);
    await _dbContext.SaveChangesAsync();
}先删子表,再删主表,避免外键约束问题 🔗
设计亮点总结
| 特性 | 说明 |
|---|---|
| 双表设计 | 通知主表 + 接收者表,支持已读状态追踪 |
| 全局懒加载 | 全局公告不预建记录,阅读时才创建 |
| 批量查询 | 发送者用户名批量回填,避免 N+1 |
| 未读计数 | 全局 + 个人分开统计,逻辑清晰 |
| 全部已读 | 用 Except 找差集补建记录 |
| 30秒轮询 | 前端定时刷新未读数 |
| 相对时间 | 「刚刚」「5分钟前」更友好 |
| 动态表单 | 全局/个人切换时接收者字段自动显隐 |
| 彩色标签 | 类型和优先级颜色区分 |
小结
通知模块看着简单,但细节不少:
- 🔑 双表设计 是追踪已读状态的标准方案
- 🔑 全局公告懒加载 避免预建 N 条记录
- 🔑 批量查询回填 是解决 N+1 的通用模式
- 🔑 未读计数 要区分全局和个人,避免重复
这套设计在任何需要 消息通知 + 已读追踪 的场景都通用 ⭐
🔗 GitHub:https://github.com/qiect/Chet.Admin 🔗 Gitee:https://gitee.com/qiect/Chet.Admin ⭐ 觉得不错的话,点个 Star 支持一下吧!
下篇预告:「Chet.Admin 模块详解⑩:文件上传下载全流程 📁」
#ChetAdmin #全栈开发 #.NET10 #Vue3 #通知系统 #N+1优化 #开源项目